Remove Windows Genuine Advantage Notifications


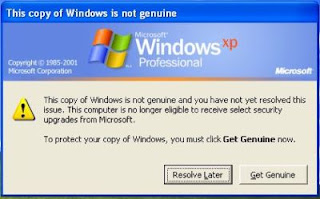
Windows Genuine Advantage notifications occur when your computer hasn't passed the validation test.


Method 1:

Step 1: Open System32 by either of the following methods:


  • Click "Start" -> "Run", then type "system32". Click "Ok".
  • Find system32 manually by clicking "Start" > "My Computer" > "(C:)" (or whatever your drive letter is) > "WINDOWS" > "system32".
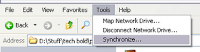
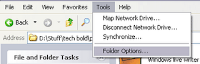
Step 2: In "system32", go to "Tools" > "Folder options", click on the tab, "View", and uncheck "Hide extensions for known file types" if it is not already.

Step 3: Check to make sure the window that comes up has a full screen of various files. The files are in alphabetical order, which makes it easier to locate the specific file.

Step 4: Find "WgaLogon.dll" and rename it "WgaLogon.dll.bak".


Step 5: Create an empty copy of WgaLogon.dll:
  • Right click on a blank space in system32 and select "New" > "Text Document".


  • Leave the text document empty and label it "WgaLogon.dll". Press Enter(on your keyboard).
  • You may get a warning from the above step that says, "If you change a file name extension, the file may become unusable. Are you sure you want to change it?". Click "Yes" on this warning.


Step 6: Be ready to complete the next two steps very quickly! Find "WgaTray.exe" in "system32" and delete it. You will then have 5 seconds to find "WgaTray.exe" in the Task Manager (the next step).
NOTE: If you remove the files mentioned above while you are in "Safe Mode," This should kill the wgatray.exe process from the Taskbar and immediately delete both files wgatray.exe and wgalogon.dll without the need to to go through all steps bellow.

Step 7: Immediately open Task Manager. Click on the process tab and click end process when "WgaTray.exe" is selected.


Note: If you take longer, do not panic! All that will happen is that "WgaTray.exe" will keep reappearing in the processes list (i.e. you won't be able to delete it as required).

Step 8: To remove the notifications after this, return to system32.

Step 9: You will find two files:"WgaLogon.dll.bak" (the one you renamed) and an Application Extension (0KB) called "WgaLogon.dll".

Step 10: Delete the Application Extension, rename "WgaLogon.dll.bak" to "WgaLogon.dll" and repeat the steps from the fifth one onwards (at a greater speed!!).

Step 11: Restart your computer once you have finished. All the notification messages should be gone.


Method 2:

Step 1: Reboot Windows in safe mode (hold the f8/f12 whatever your PC suits key while booting and you will get the option to boot in safe mode).

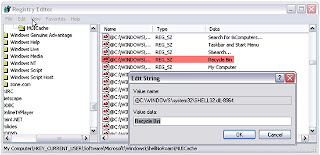
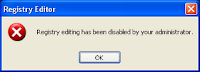
Step 2: Open Registry Editor (regedit.exe) and search for wgalogon folder and delete it. You should backup up the registry beforehand, in case somethiong goes wrong.

Step 3: In your windows directory search for files wga* and delete them.

Step 4: Now reboot back normally and continue your work. Windows Genuine Advantage will not bother you anymore.

Use you Pen Drive or Flash drive as RAM


1) Connect your pen drive to your PC [pen drive should be at least 1 GB or if you having 4 GB then its better]

2) Allow PC what he is supposed to do,let system to detect pen drive.

3) After your PC finished with his detection work,you have to do some little

4) Right click on the My Computer and select the Properties.

5) Goto Advanced and then performance setting then Advanced then.

6) Select pen drive and click on custom size " Check the value of space available "

7) Enter the same in the Initial and the Max columns
" You just used the memory of the PenDrive as a Virtual Memory "

8) Now restart your pc and enjoy your fast and super system.

Enjoy...

Rename the Recycle Bin


1. Click Start

2. Click Run

3. Type regedit and hit ENTER

4. In the registry editor go to the following key:
HKEY_CURRENT_USER\Software\Microsoft\Windows\ShellNoRoam\MUICache

5. Find and Double click on the following value:
@C:\WINDOWS\system32\SHELL32.dll,-8964


6. Change the value to whatever you wish.

7. Click OK and close out regedit

8. Click on a blank area of the desktop and select refresh from the context menu.

9. After the screen refreshes, you recycle bin will be renamed to whatever you decided.

Enjoy...

Disable Windows XP Error Reporting


When a system error occurs in XP, a little dialog box appears asking if you want to report the error to Microsoft. Click the message box to make it disappear. You don't have to report the error if you don't want to and on today's "Call for Help" Leo shows you how to turn off the feature if you find it distracting.
To disable error reporting, follow these directions:

1. Right-click My Computer and choose Properties.
2. Click the Advanced tab on your System Properties dialog box.
3. Click the Error Reporting button on the Advanced tab.
4. Place a checkmark next to "Disable error reporting."


5. Leave the other radio button unchecked next to the text labeled, "But notify me when critical errors occur."
6. Click OK.

Enjoy...

Remove Shutdown Option From Start Menu


You might be using some shortcut / shortcut keys for performing Shutdown and you don't the Shutdown option in Start Menu . If the case is so , just follow the following steps.

1: Goto Run and type gpedit.msc
2: Navigate to User Configuration->Administrative Templates->Start Menu &Taskbar
3: Find the option 'Remove Shutdown on Start Menu' and set is as 'Enable'.


Enjoy

Display a Logon Message ( Display message when someone logs in )


Method 1 ( Registry Tweaking ) :

1: Start Registry Editor ( Start >> Run >> type "regedit" >> Hit enter.
2: Navigate to: HKEY_LOCAL_MACHINE \ SOFTWARE \ Microsoft \ Windows NT \ CurrentVersion \ Winlogon
3: Change the text in LegalNoticeCaption to set the text for the title of the message window that will be displayed.
4: Change the text in LegalNoticeText to set the actual message you wanted displayed.
5: The settings will take effect when someone logins the system next time.

Method 2 ( Using Administrative Tools ) :

1: Click Start >> Control Panel.
2: Click System and Maintenance, Administrative Tools and then the Local Security Policy.
3: Within the console, expand Local Policies.
4: Click Security Options. The various security options are displayed in the details pane.
5: Scroll through the options and locate Interactive Logon: Message text for users attempting to log on.
6: Double click the security option.
7: Type in the message text that you want users to see.
8: Click OK.
9: The settings will take effect when someone logins the system next time.

Enjoy...

See Deleted File History


Follow the steps:

1. Boot into "safe mode command prompt" using F8
2. Go to Root (C:\) by typing CD\
3. Now type C:\ del index.dat /s
4. Press ENTER
The deleted files will appear.

Enjoy...

Disable or Enable Folder Options in XP


Folder options are very important when a system is shared between users. One of the main functionality that can be changed from folder options is to view hidden or/and super hidden files and folder in Windows XP, some times it happens because of virus too.

Before


After


So, if you share your system among multiple users, it is advisable to disable the folder options in Windows XP.

1: Start->Run->"gpedit.msc"

2: Navigate to "User Configuration >> Administrative Templates >> Windows Components >> Windows Explorer.

3: Finally, on the right enable the option of "Remove the Folder Options menu item from the Tools Menu" by right clicking on it and selecting disable.

Eenjoy...

Enable / Disable Regedit (Registry Editing Tool) in XP


Sometimes because of a virus or some software, the registry editing tool "regedit" ( Accessed by Start >> Run >> "regedit" ), gets disabled. This is quite irritating as you get this message when you try to access "regedit".


Also sometimes, you might want to restrict users to change registry.

Here is a solution for the same :

1: Open gpedit tool ( Start >> Run >> "gpedit.msc" )

2: Navigate to User Configuration >> Administrative Templates >> System

3: On the right side double click on "Prevent Access To Registry Editing Tools".

4: Select Enable/ Disable and you are done.

Enjoy...

Remove the Username or User Pic from Start Menu


(1) Remove Username :

Start> Run> regedit.exe and navigate to the this key:

HKEY_CURRENT_USER \ Software \ Microsoft\ Windows \ CurrentVersion \ Policies \ Explorer

In the right-pane, set NoUserNameInStartMenu value-data to 1

Close Regedit.exe and restart Windows.

(2) Remove the user name and user account picture from Start Menu, in order to have a blank blue panel at the top, try this:

Start Windows Explorer and go to this folder:
C:\Documents and Settings\All Users\Application Data\Microsoft\User Account Pictures

From that folder, rename the BMP file which corresponds to your user account. ( For example, if your username is avi, rename avi.bmp to old_avi.bmp )

Next, rename the following folder:

C:\Documents and Settings\All Users\Application Data\Microsoft\User Account Pictures\Default Pictures to something else, say...

C:\Documents and Settings\All Users\Application Data\Microsoft\User Account Pictures\No_Default Picture.

Enjoy...

Prevent failed DNS lookups from getting cached

DNS (Domain Name System) caching is used to resolve hostnames for faster access. The problem with this feature is that failed DNS lookups also get cached.

To change so that it will not cache failed DNS lookups...

Step 1: Flush the DNS cache manually

Go to the Command Prompt
Enter ipconfig /flushdns

Step 2: To permanently solve, modifing the Registry

Click Start
Click Run
Enter regedit
Click OK

Go to
HKEY_LOCAL_MACHINE > SYSTEM > CurrentControlSet > Services > Dnscache >Parameters

Change following Parameters the the values as given bellow:

NegativeCacheTime=0 (DWORD default=300 seconds)

NetFailureCacheTime=0 (DWORD default=30 seconds)

NegativeSOACacheTime=0 (DWORD default=120 seconds)

Step 3: Restart Computer

Increase Trial Period For Trial Version Software Forever


RunAsDate is a small utility that allows you to run a program in the date and time that you specify. This utility doesn’t change the current system date, but it only injects the date/time that you specify into the desired application.
RunAsDate intercepts the kernel API calls that returns the current date and time (GetSystemTime, GetLocalTime, GetSystemTimeAsFileTime), and replaces the current date/time with the date/time that you specify. It works with Windows 2000, XP, 2003 and Vista.
NOTE: FOLLOW THESE TIPS CAREFULLY
You have to follow these tips carefully to successfully hack a software and make it run in it’s trial mode forever.
1. Note down the date and time, when you install the software for the first time.
2. Once the trial period expires, you must always run the software using RunAsDate.
Download Software From here....
3. After the trial period is expired, do not run the software(program) directly. If you run the software directly even once, this hack may no longer work.
4. It is better and safe to inject the date of the last day in the trial period.
For example, if the trial period expires on jan 30 2009, always inject the date as jan 29 2009 in the RunAsDate. I hope this helps! Please express your experience and opinions through comments.
Enjoy...

Folder which can't be created in Windows and it's crack

Folders with name: CON, PRN, AUX, CLOCK$, NUL, COM1, COM2, COM3, COM4, COM5,COM6, COM7, COM8, COM9, LPT1, LPT2, LPT3, LPT4, LPT5, LPT6, LPT7, LPT8, & LPT9 cant be created using Windows Explorer or Command Prompt directly!

Try creating them anywhere and you will fail . This is prevented as XP terms these folders as SYSTEM Folder Names reserved only for the Operating System.

But there is a trick to create them (using command prompt ) :

Open command prompt by typing cmd in run window & type : md \\.\\C:\con . 

Start Button Rename Windows XP

Step 1 – Modify Explorer.exe File In order to make the changes, the file explorer.exe located at C:\Windows needs to be edited. Since explorer.exe is a binary file it requires a special editor. For purposes of this article I have used Resource Hacker. Which is used to view, modify, rename, add, delete and extract resources in 32bit Windows executables and resource files (*.res). To download it CLICK HERE

First make a backup copy of the file explorer.exe located at C:\Windows\explorer. Place it in a folder somewhere on your hard drive where it will be safe. Start Resource Hacker and open explorer.exe located at C:\Windows\explorer.exe.Now navigate to the String Table. Now click on 37 and then on 1033 as shown in the figure.


Instead of “start” just write the word you want to replace with start. Like “Solution”.

Now click to compile script button and then save the altered file bye any name you wish like explorerchanged.exe using the Save As command on the File Menu. Do not use the Save command .


Step 2 – Modify the Registry

Go to start , navigate to Run and type regedit in the Open: field. Navigate to: HKEY_LOCAL_MACHINE\ SOFTWARE\ Microsoft\ Windows NT\ CurrentVersion\ Winlogon In the right pane , double click the Shell entry to open the Edit String dialog box as shown in Fig. 06. In Value data: line, enter the name that was used to save the modified explorer.exe file. Click OK.


After rebooting your system you will see your text on the Start button

>

Another Way Simple With Software

To Download Software Click here

Install software and Run, Type Your Text and have fun...

Enjoy...